.png?width=240&height=55&name=Untitled%20design%20(86).png)
Purpose: Use a temporary mobile hotspot to reach the Citizen LAN Board, then configure the printer for the permanent Wi-Fi network. This method is useful when the printer is not conveniently located near a wired network connection.
Applies to: Citizen CT-E651 equipped with the Citizen Ethernet/Wireless LAN interface board and wireless module.
You will need: The printer, an Android smartphone capable of creating an open (unsecured) mobile hotspot, and a second device such as an iPad, tablet, laptop, or another phone to open the Citizen LAN Board configuration page.
Note: iPhone Personal Hotspot cannot be configured with Open/None security, so an Android device is recommended for the temporary hotspot used in this procedure.
1. Print the Current Network Information
- Power on the printer. Make sure paper is loaded and the printer is ready.
- Locate the round black interface-board button. It is on the rear network interface board near the Ethernet port and status LEDs.
- Briefly press and release the round black button. Do not hold it down. A short press prints the I/F Board Information sheet.
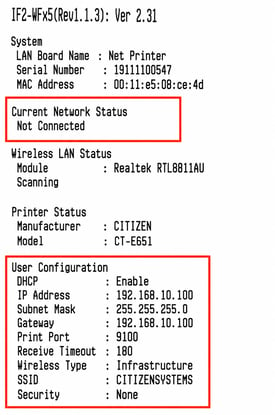
- Review the printout. Confirm that the printer has a Wireless LAN module and note the current SSID, security setting, and network status.
Typical factory/default wireless values seen in this process: SSID = CITIZENSYSTEMS, Network Type = Infrastructure, Security = None, DHCP = Enable.
|
|
On the smartphone that will provide the temporary hotspot:
Important: Before changing the hotspot, take a screenshot of the phone's original hotspot name, password, band, and security settings so they can be restored at the end.
- Open the phone's Mobile Hotspot settings. On Samsung Galaxy phones this is typically Settings > Connections > Mobile Hotspot and Tethering > Mobile Hotspot.
- Change the hotspot Network name to exactly: CITIZENSYSTEMS
- Set Security to Open/None. Do not use a password for this temporary hotspot because the printer is currently configured for Security = None.
- Use 2.4 GHz if the phone requires a band selection. This is a safe compatibility choice for the temporary setup network.
- Turn the hotspot on. Leave it running while the printer connects.
- Wait 30-60 seconds. The printer should automatically find and connect to the temporary CITIZENSYSTEMS hotspot.
- Briefly press and release the round interface-board button again. Print a new I/F Board Information sheet.
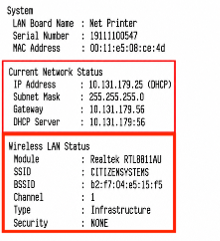
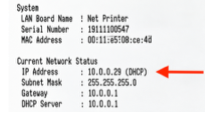
- Check Current Network Status. The printer should now show a DHCP-assigned IP address instead of Not Connected.
- Check Wireless LAN Status. SSID should show CITIZENSYSTEMS and Security should still show NONE.
Example: A mobile hotspot may assign an address such as 10.x.x.x. The exact address will vary. Use the IP address shown on your printout.
4. Open the Citizen LAN Board Configuration Page
- Connect a second device to the temporary CITIZENSYSTEMS hotspot. Use an iPad, tablet, laptop, or desktop.
- Open a web browser. Safari or Chrome can be used.
- Enter the printer's current DHCP IP address in the address bar. For example: http://10.x.x.x
- Select CONFIG. You will be prompted to log in to the LAN Board. Enter "admin" for both the username and password, then click Login.
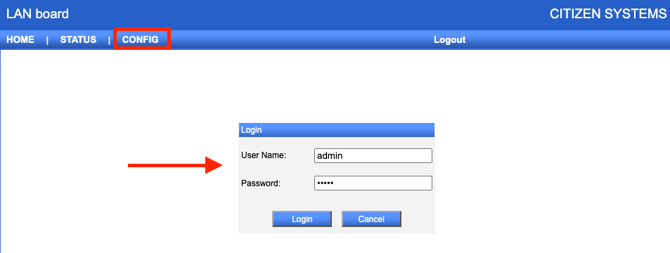
- Confirm the Citizen LAN Board page opens. You should see tabs or menu options such as System Status, Network Status, Wireless LAN, and configuration pages.
- Open Wireless LAN configuration. Navigate to the Wireless LAN settings in the Citizen LAN Board.
- Set Network Type to Infrastructure. This allows the printer to connect to the facility's normal Wi-Fi network.
- Enter the permanent Wi-Fi SSID. Type the network name exactly as it appears.
- Select the correct security type. For most business/home networks this is WPA2-PSK AES or a compatible WPA/WPA2 setting.
- Enter the Wi-Fi password/key. Verify spelling and capitalization.
- Leave DHCP enabled unless your network administrator requires a static IP. DHCP is the easiest initial setup method.
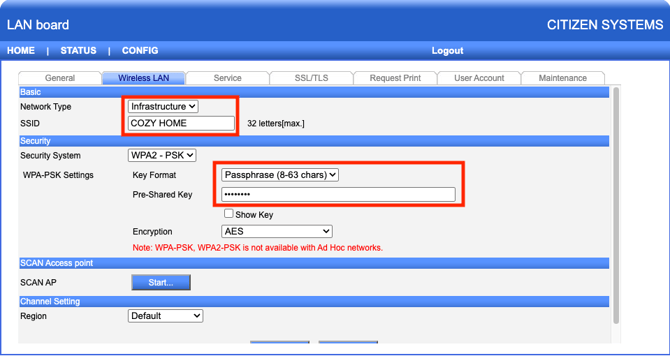
- Submit the Wireless LAN settings. The printer will disconnect from the temporary hotspot and attempt to join the permanent Wi-Fi network.

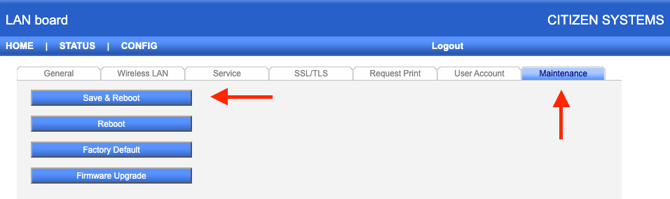
- Once submitted, navigate to the Maintenance tab and select Save & Reboot.
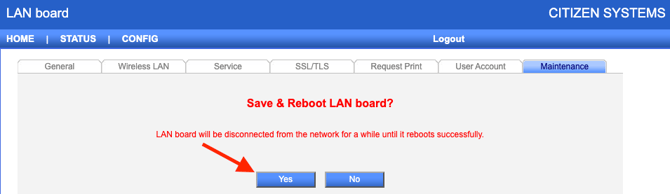
- Select YES to Save & Reboot LAN board.
- Wait for the printer to reconnect. Allow approximately 30-60 seconds after saving and rebooting the Wireless LAN settings.
- Turn off the temporary CITIZENSYSTEMS hotspot. The printer should no longer need it.
- Briefly press and release the printer's round interface-board button. Print another I/F Board Information sheet.
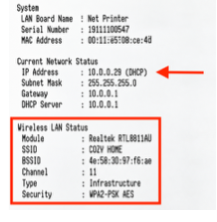
- Verify the permanent SSID. Wireless LAN Status should show the facility's Wi-Fi network name.
- Verify the new DHCP IP address. Current Network Status should show an IP address assigned by the permanent network.
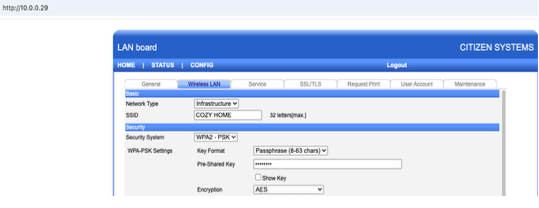
- Browser check. Connect your setup device to the same permanent Wi-Fi network and browse to the new printer IP address to confirm the Citizen LAN Board is reachable.
7. Restore the Phone Hotspot to Its Original Settings
- Open the smartphone's Mobile Hotspot settings.
- Restore the original network name. Use the screenshot you took before beginning setup.
- Restore the original password.
- Restore the original band and security settings.
- Tap Save. The phone hotspot is now back to its original configuration.
Note: Restoring the phone hotspot will not affect the printer after the printer has successfully joined the permanent Wi-Fi network.
8. Configure Request PrintOn your setup device connected to the printer's permanent Wi-Fi network, open a web browser. Enter the printer's new IP address in the address bar and press Enter. The Citizen LAN Board configuration page should open, as shown below:
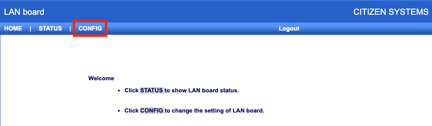
- Select CONFIG. You will be prompted to log in to the LAN Board. Enter "admin" for both the username and password, then click Login.
- Select the Request Print tab.
- Enable Request Print.
-
- Update URL: https://admin.teesnap.com/teesnap-rest-service/print-jobs-citizen
- Update Interval: 5
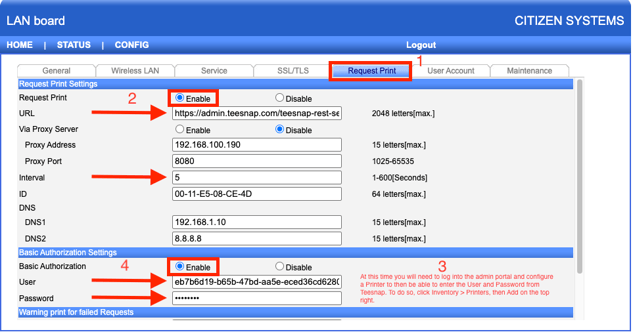
- Log in to the Teesnap Admin Portal and configure the printer so you can obtain the username and password required by the Citizen LAN Board. Go to Inventory > Printers, then select Add in the upper-right corner.

- Enter a name for the printer and the MAC address shown on the I/F Board Information printout or listed as the ID in the Citizen portal. Click Save. Then select the Pencil/Edit icon to view the system-generated username and password.
Note: For Citizen printer, enter the MAC address in Teesnap Admin using dashes (-) instead of colons (:).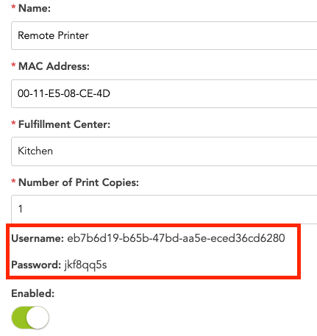
- Copy the system-generated username and password and paste them into the Basic Authorization Settings section of the Citizen LAN Board. Make sure Basic Authorization is enabled.
- Submit Request Print Settings.
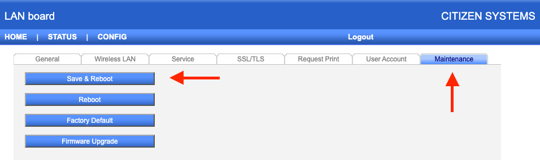
- Once submitted, navigate to the Maintenance tab and select Save & Reboot.
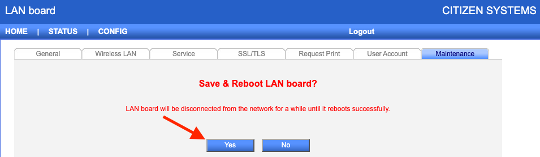
- Select YES to Save & Reboot LAN board.
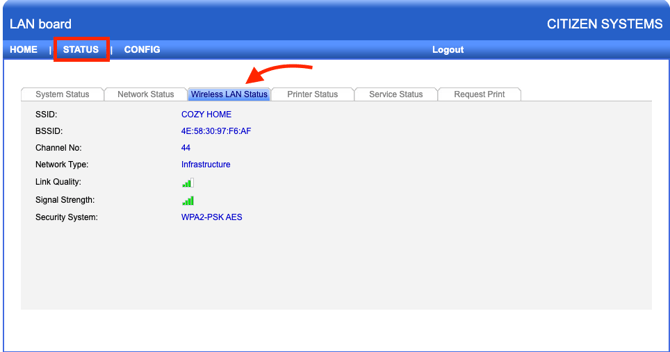
- In the Wireless LAN Status tab, you will be able to verify that the printer is successfully connected to the Permanent Wi-Fi network.
- Perform a test print to ensure the wireless connection is functioning properly.
Troubleshooting
|
Issue |
What to Check |
|
Printer still shows Not Connected |
Confirm the temporary hotspot is named exactly CITIZENSYSTEMS and that the temporary hotspot security is Open/None. Restart the hotspot and wait another 30-60 seconds. |
|
Citizen LAN Board will not open |
Make sure the setup device is connected to the same temporary hotspot as the printer. Use the current DHCP IP address from the latest I/F Board Information printout, not the printer's old/default IP. |
|
Printer does not join the permanent Wi-Fi |
Recheck the SSID, password, and security type. Confirm the permanent Wi-Fi allows standard client devices to communicate and does not require a browser-based captive portal. |
|
Printer receives a different IP later |
For a production printer, consider creating a DHCP reservation in the router/firewall so the printer keeps the same IP address. |
|
Need to print network information |
Use a brief press-and-release of the round interface-board button. Avoid holding the button because longer presses may perform other interface functions. |
If you have any questions, please do not hesitate to reach out to Teesnap Support by emailing us at support@teesnap.com or calling 844-458-1032